Welcome to this tutorial on using SuperCFD, your all-in-one solution for heat transfer, fluid dynamics, and solid mechanics simulations. Today, we'll walk you through a simple yet fundamental simulation: conducting heat transfer analysis on a cube. This tutorial aims to provide you with a comprehensive understanding of the steps required to initialize the solver within SuperCFD, using a straightforward geometry available directly within the software.
Heat transfer simulations are crucial in various engineering applications, from designing efficient cooling systems to optimizing thermal management in electronic devices. By following this guide, you'll learn how to set up and run a basic heat transfer simulation, which will serve as a solid foundation for tackling more complex problems in the future.
Setting up the Geometry

SuperCFD simplifies the process of setting up simulations by providing a range of predefined geometries that users can select and customize. For this tutorial, we will use one of these predefined geometries: the cube.
Navigating the Interface

Boundary Conditions
For this simulation, we will define two boundary conditions: one for the front face of the cube and one for the back face. Boundary conditions are crucial as they define how the cube interacts with its surroundings.
For this simulation, we will define two boundary conditions, one for the front of the cube and one for the back.
Naming the Boundary Condition
Start by naming your boundary condition for easy reference. This will help keep track of multiple conditions, especially in more complex simulations.

Selecting a Face
Use the automatic tool to select the front face of the cube. You can also define an angle threshold if necessary to ensure accurate face selection.
Then, we can use the automatic tool to select a face, additionally defining its angle threshold if necessary.

Setting Temperature for the Front Face
Initialize the parameters for the face's temperature by selecting the first button. Set the temperature to 0°C for the front face.

Defining the Back Face
Similarly, define the boundary condition for the back face of the cube. This time, set the temperature to 100°C.
This setup establishes a temperature gradient across the cube, enabling the simulation of heat transfer from the back to the front.
Choosing the material
Material properties are vital for accurate simulation results. SuperCFD allows you to assign predefined materials or create custom ones based on your requirements.
Select Material: Navigate to the material properties section. Choose a predefined material that matches the thermal properties needed for your simulation. For this tutorial, we'll use a standard conductive material.
Custom Material Definition: If the predefined materials do not meet your requirements, you can define a custom material by specifying its thermal conductivity, specific heat, and density.

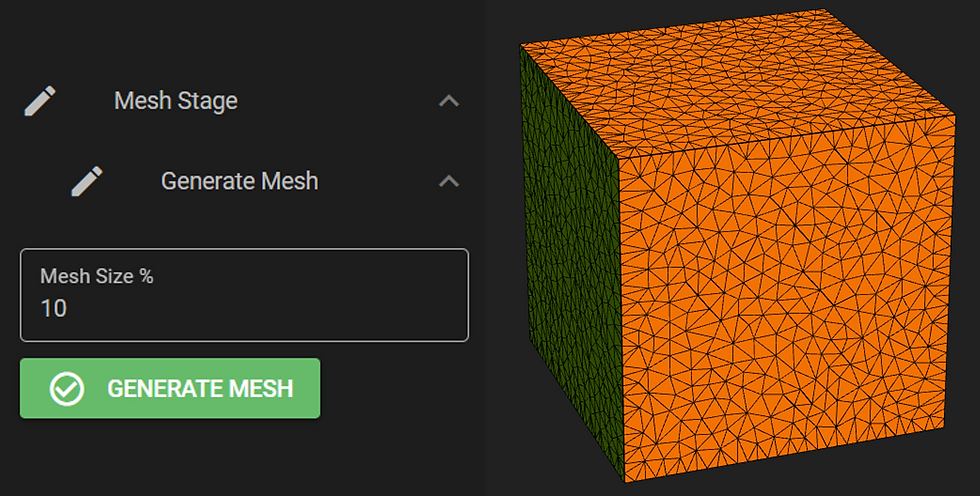
Defining the Mesh Parameters
Meshing divides the geometry into smaller elements, enabling detailed analysis. The solver will set a triangular mesh grid by default, which is suitable for most simulations.
Define the mesh size according to the desired level of detail. For this tutorial, we will opt for a 10% mesh size. This balance ensures accuracy without excessive computational demand.
Initializing the Solver
With the geometry, material properties, boundary conditions, and mesh parameters set, it's time to initialize the solver.
Navigate to the solver settings. Ensure that the solver is configured to handle heat transfer simulations. SuperCFD's default settings are optimized, but adjustments can be made based on specific needs.
After having executed the simulation, the solver will process the data and provide results efficiently.

Results & Visualisation
After the solver is initialized, we quickly achieve our results. SuperCFD provides robust tools for result visualization and analysis.
We can observe the convergence history to ensure the solver has accurately reached a solution.

Next, we can use SuperCFD's plotting options to visualize the heat transfer results and customize the number of keys and color scale for a clear and informative display.

We can now analyze the visualized data to understand the heat distribution across the cube. This step is crucial for validating the simulation and deriving meaningful conclusions.

And there we go! Thanks to SuperCFD, the heat transfer on the cube can be visualized in seconds, providing valuable insights into thermal behavior. This tutorial has guided you through the essential steps of SuperCFD, equipping you with the knowledge to perform more complex simulations in the future.
Stay tuned for more tutorials!
Comments